API Programming Contest: Win A $100 Amazon Gift Card

Think you’re a crack API programmer? We’ll find out! CADSharp.com is excited to announce its first SolidWorks API programming contest. Here’s how to enter and win one of three gift cards from Amazon or a 2-month membership to CADSharp.com:
- Download the example file set here and open “CADSharp_contest.SLDASM”.
- Write a macro in as few lines as possible that discovers and displays a single message box listing the children of all part components in the assembly.
- Submit the macro to contest@cadsharp.com before August 23, 12:00AM EST.
- The winners will be announced on our blog on August 24, along with everyone else who submitted a working macro, ranked from fewest lines to most lines.
A correct solution will contain the names of all of the children listed in the Parent/Child dialog box of each part (i.e., non-assembly) component. An example of the correct solution is shown here (list order may vary).
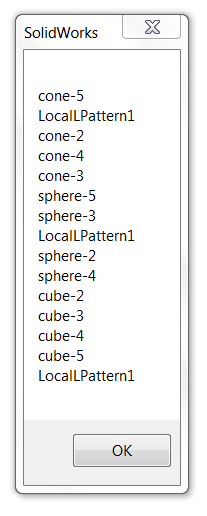
Prizes
Three winners will be chosen based on the number of lines of code in their macro.
First prize: $100 gift card at Amazon.com, Inc.
Second prize: $50 gift card at Amazon.com, Inc.
Third prize: $50 gift card at Amazon.com, Inc.
Please note that Amazon gift cards can only be awarded to entrants living in the United States, Canada, United Kingdom, Germany, Italy, France, Spain, China, and Japan. If a winner does not live in one of these countries, a 2-month Power User membership (valued at $199) will be awarded instead. Optionally, a winner that is entitled to a gift card may choose to receive the 2-month CADSharp.com Power User membership instead.
Contest Details
- Comments and blank lines will not be considered in the line count.
- You may not hard-code the name of any entity into your solution.
- The only acceptable precondition for running the macro is this: CADSharp_contest.SLDASM is open.
- Please read the full list of contest rules here.
May the best programmer win!
Keith
Want to be informed of future CADSharp.com contests? Sign up for our newsletter.
RunCommand: The Swiss-Army Knife of the API

ISldWorks::RunCommand is probably the most powerful call in the entire SolidWorks API. Using this single, easy-to-use API call you can execute over 3,000 individual SolidWorks commands. Need to copy and paste an object? ISldWorks::RunCommand. Need to bring up a feature’s PropertyManager page? ISldWorks::RunCommand. Need to hide the FeatureManager tree? ISldWorks::RunCommand. That’s right—many actions that seemingly have no corresponding API call can be fired using this incredibly versatile method.
But you know what’s amazing? Most API programmers don’t even know it exists! I was one of those programmers for much longer than I would like to admit. Let’s prevent that from being your case as well.
The Basics
First of all, you may have noticed in the API Help a command very similar to ISldWorks::RunCommand called IModelDocExtension::RunCommand. The only difference between the two is that the former can also simulate mouse clicks using the members of swMouse_e, whereas the latter cannot. Keep things simple by always using ISldWorks::RunCommand, which requires these two arguments:
CommandID – This is where you specify the desired SolidWorks command as defined in the swCommands_e enumeration, which contains the list of the 3000+ commands I mentioned earlier.
NewTitle – This is an arbitrary title that you pick that will appear in the title of PropertyManager pages, should you use ISldWorks::RunCommand to open such a page. If you have no need to specify a title, you can set it to Empty.
Finally, the return value is a True or False depending on whether the command successfully runs.
Example 1: Hiding the FeatureManager tree
I see this one in the API forums occasionally. Within SolidWorks, you can click the little tab with three arrows on it, and this will hide or show the FeatureManager tree. Search through the API all you want and you will never find an API call that shows or hides the FeatureManager tree. Yet if we go to the swCommands_e listing and search for the keyword “tree” then we will eventually come across swCommands_Hideshow_Brwser_Tree.
So what will this look like in our code? Try this out:
Dim swApp As SldWorks.SldWorks

    Sub main()

    Set swApp = Application.SldWorks

    Debug.Print swApp.RunCommand(swCommands_Hideshow_Brwser_Tree, Empty)

End Sub
The most difficult part, as you can tell, is actually finding the correct command in swCommands_e. My advice is to search for simple, obvious words like “tree” rather than “FeatureManager”. Nevertheless you may have to test out different commands before you find the right one.
Example 2: Displaying a feature’s PropertyManager page
Whereas most automation macros are not concerned with the user interface, other macros may want to involve the user at some point along the way. In that case it may be useful to bring up the appropriate feature PMP or dialog box. In this case, we want to display the extruded boss/base PMP. Notice that the PMP title is changed to “test”:
Dim swApp As SldWorks.SldWorks

Dim swModel As SldWorks.ModelDoc2

Sub main()

    Set swApp = Application.SldWorks

    Set swModel = swApp.ActiveDoc

    swApp.RunCommand swCommands_Fillet, "Test"

End Sub
If you want to see this example taken to the next level, check out our free macro “Run individual SolidWorks commands” which uses ISldWorks::GetRunningCommandInfo to return the information about the open PMP.
Example 3: Move a BOM to a different sheet
Ever wanted to move a BOM using the API? Good luck trying to do with IDrawingDoc or any other drawing-related interface. Instead you need to replicate with RunCommand what you would do manually, which is cut and paste the BOM. To use this example, open up a new drawing with two sheets, one of which is named Sheet2. Select the BOM and run this code.
Dim swApp As SldWorks.SldWorks

Dim swModel As SldWorks.ModelDoc2

Dim swDraw As SldWorks.DrawingDoc

Sub main()

    Set swApp = Application.SldWorks

    Set swModel = swApp.ActiveDoc

    Set swDraw = swModel

    swApp.RunCommand swCommands_Cut, Empty

    swDraw.ActivateSheet "Sheet2"

    swApp.RunCommand swCommands_Paste, Empty

End Sub
You might notice that the BOM is being pasted at the location of your cursor. If you’re a premium member, check out the version of this macro that programmatically selects the BOM so that the user need not pre-select it and also positions the BOM at a precise location on the drawing.
That concludes our look at what I call the “Swiss Army knife of the SolidWorks API”. Please share your comments and questions below.
Commanding,
Keith
Want to keep up with new CADSharp.com content? Sign up for our newsletter.
Password-Protect VBA Macros & Other VB Editor Tricks

The lowly Visual Basic Editor is sometimes looked down upon in comparison to the feature-robust design-environment available with .NET macros and add-ins. Its true, the VB Editor is rather lowly in comparison. When it comes to churning out macros at break-neck speed, however, VBA macros can’t be beat. Since most of you create VBA macros using the VB Editor, I thought I’d share with you a few tricks I’ve accumulated over the years.
Password protect your source code
By default, the code in a VBA macro is unprotected and visible to anyone who simply opens the .swp file by going to Tools–>Macro–>Edit. Changing the .swp file to a protected state is very simple.
- Open the macro in the VB Editor
- In the Project Explorer on the left, right click “
Properties” - Click the Protection tab
- Click the “Lock project for viewing” check box, choose a password, and click OK
Now you can distribute the macro to your heart’s content with no concern about your code being viewed.
Quickly return to SolidWorks with Alt+F11
In most of my videos, to return from the VB Editor to SolidWorks I use Alt+Tab. I do this mostly out of habit. This shortcut, however, sometimes brings up the wrong window if you aren’t careful. If you want to avoid any hassle with Alt-Tab and just go right back to the SolidWorks application, then either hit Alt+F11 or press this button in the top left of the VB Editor.

Quickly bring up parameter info with Ctrl+I
As you know from watching Lesson 2.2 in our VBA course, once you’ve early bound your objects you can start using Microsoft’s Intellisense technology to see a SolidWorks API function’s parameter info during design time. Later, if you need to modify an argument, the parameter info listing does not re-appear unless you delete out and reinsert a comma or parenthesis. Using the Ctrl+I keyboard shortcut, however, you can bring up the parameter info once your cursor is within argument text.

Turn off auto syntax check
Often times while programming, I decide not to finish typing the current line and instead move to another line. The result is a rather annoying message box that looks like this.

Fortunately, the automatic syntax checking that causes these dialog boxes can be turned off. Simply go to Tools–>Options, and then un-check “Auto Syntax Check”. No more annoying dialogs.
Change the code window colors
Many times programmers will change the code window background to black and the text to bright green, white, or yellow in an effort to either 1) reduce the monitor’s brightness, which saves battery life and is a little easier on the eyes, or 2) set themselves apart from the crowd in an effort to be rogue and cool. (As rogue and cool as a programmer can be, anyway.)

So if you’re like me and fall into this camp for all of the reasons listed (though mostly to be rogue and cool) then feel free to modify the colors by going to Tools–>Options, Editor Format tab, and changing the foreground and background of the following Code Colors to your liking: Normal Text, Syntax Error Text, Comment Text, Keyword Text, and Identifier Text. Requires a little bit of setup, yes, but the end result is that your co-workers will surely pass your desk, notice your custom-colored code window, and think, “That guys clearly knows his stuff.” Clearly.
Now its your turn: what VB Editor tips and tricks make you a more savvy coder?
Thanks for tuning in,
Keith
Want to keep up with new CADSharp.com content? Sign up for our newsletter.