Password-Protect VBA Macros & Other VB Editor Tricks
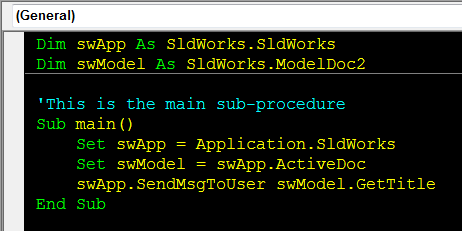
The lowly Visual Basic Editor is sometimes looked down upon in comparison to the feature-robust design-environment available with .NET macros and add-ins. Its true, the VB Editor is rather lowly in comparison. When it comes to churning out macros at break-neck speed, however, VBA macros can’t be beat. Since most of you create VBA macros using the VB Editor, I thought I’d share with you a few tricks I’ve accumulated over the years.
Password protect your source code
By default, the code in a VBA macro is unprotected and visible to anyone who simply opens the .swp file by going to Tools–>Macro–>Edit. Changing the .swp file to a protected state is very simple.
- Open the macro in the VB Editor
- In the Project Explorer on the left, right click “
Properties” - Click the Protection tab
- Click the “Lock project for viewing” check box, choose a password, and click OK
Now you can distribute the macro to your heart’s content with no concern about your code being viewed.
Quickly return to SolidWorks with Alt+F11
In most of my videos, to return from the VB Editor to SolidWorks I use Alt+Tab. I do this mostly out of habit. This shortcut, however, sometimes brings up the wrong window if you aren’t careful. If you want to avoid any hassle with Alt-Tab and just go right back to the SolidWorks application, then either hit Alt+F11 or press this button in the top left of the VB Editor.
Quickly bring up parameter info with Ctrl+I
As you know from watching Lesson 2.2 in our VBA course, once you’ve early bound your objects you can start using Microsoft’s Intellisense technology to see a SolidWorks API function’s parameter info during design time. Later, if you need to modify an argument, the parameter info listing does not re-appear unless you delete out and reinsert a comma or parenthesis. Using the Ctrl+I keyboard shortcut, however, you can bring up the parameter info once your cursor is within argument text.
Turn off auto syntax check
Often times while programming, I decide not to finish typing the current line and instead move to another line. The result is a rather annoying message box that looks like this.
Fortunately, the automatic syntax checking that causes these dialog boxes can be turned off. Simply go to Tools–>Options, and then un-check “Auto Syntax Check”. No more annoying dialogs.
Change the code window colors
Many times programmers will change the code window background to black and the text to bright green, white, or yellow in an effort to either 1) reduce the monitor’s brightness, which saves battery life and is a little easier on the eyes, or 2) set themselves apart from the crowd in an effort to be rogue and cool. (As rogue and cool as a programmer can be, anyway.)
So if you’re like me and fall into this camp for all of the reasons listed (though mostly to be rogue and cool) then feel free to modify the colors by going to Tools–>Options, Editor Format tab, and changing the foreground and background of the following Code Colors to your liking: Normal Text, Syntax Error Text, Comment Text, Keyword Text, and Identifier Text. Requires a little bit of setup, yes, but the end result is that your co-workers will surely pass your desk, notice your custom-colored code window, and think, “That guys clearly knows his stuff.” Clearly.
Now its your turn: what VB Editor tips and tricks make you a more savvy coder?
Thanks for tuning in,
Keith
Want to keep up with new CADSharp.com content? Sign up for our newsletter.
Schedule Macros Using the Task Scheduler
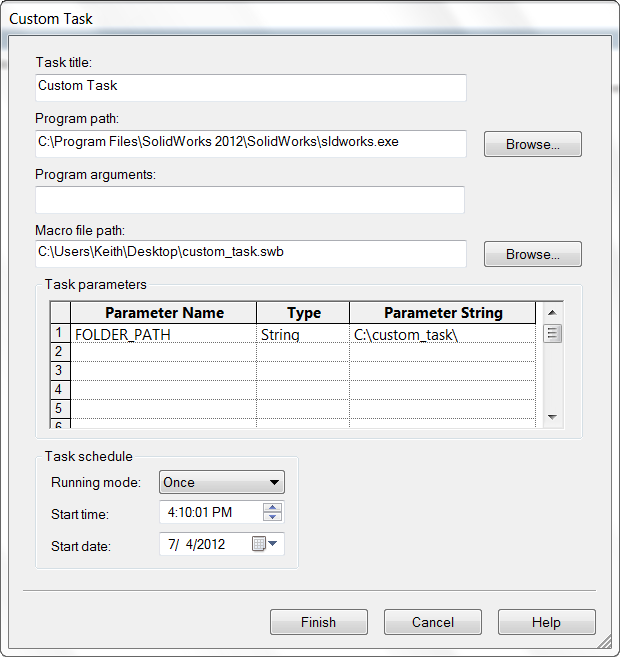
Have a macro that you’d like to run on all models in a directory while out of the office? Enter the Task Scheduler. Located in the SolidWorks Tools directory in your Start Menu, this program allows you to schedule batch operation tasks like updating the versions of your files, converting your models to DXF, updating custom properties, and so on. Those with SolidWorks Professional or Premium have the “Run Custom Task” option, which allows you to schedule the execution of a macro as well as specify its parameters.
As an example, let’s say that each night at 12:00 AM you want to open up every part in a directory and change the display setting to “shaded without edges”. Here are the steps you would follow:
1. Write a macro that opens up every part in a specified directory and changes the display the setting. In the code below you can see that the current specified directory is “C:\custom_task\”. (Download the files here.)
Dim swApp As SldWorks.SldWorks

Dim swModel As SldWorks.ModelDoc2

Const strFolderPath As String = "C:\custom_task\"

Dim strFileName As String

Sub main()

    Set swApp = Application.SldWorks

    strFileName = Dir(strFolderPath & "*.SLDPRT")

    While strFileName <> ""

        Set swModel = swApp.OpenDoc6(strFolderPath & strFileName, _

            swDocPART, 1, Empty, Empty, Empty)

        swModel.ViewDisplayShaded

        swModel.Save3 1, Empty, Empty

        swApp.QuitDoc swModel.GetTitle

        strFileName = Dir

    Wend

    swApp.ExitApp

End Sub
2. Copy the code from the VB editor to Notepad and change the strFolderPath value to $$$FOLDER_PATH$$$. Your variable declaration for strFolderPath should now look like this:
Const strFolderPath As String = $$$FOLDER_PATH$$$
3. Save the text file as a .swb file.
4. Open Task Scheduler
5. Choose Run Custom Task
6. Click the Browse button next to Macro File Path and locate the .swb you just created
7. In the task parameters section, you should now see a parameter called FOLDER_PATH. Click in the Parameter String cell on the right and enter the directory that contains the files you want to convert to shaded without edges
8. After specifying the running mode, start time, and start date, click Finish and your task should be added to the queue. If you left the start time and date at their initial values then the task should start running immediately.
Some additional comments and notes about using the Task Scheduler with macros:
- You can also run regular .swp files using the Task Scheduler. With these files, however, you cannot specify parameters. The macro will simply run “as is”. To be able to specify parameters you have to use an .swb file.
- Optionally, you can simply change the variables in the .swp file to $$$
$$$, save the .swp file, and then rename the extension to .swp. - You can control string an numeric parameters using the Task Scheduler. Use $$$
$$$ for string values and ### ### for numeric values. - If you do not use ISldWorks::ExitApp at the end of your macro, the SolidWorks application will not close after the task is finished running. Consequently, the task will not be marked as Complete within the Task Scheduler.
- You do not need to have the Task Scheduler open for the scheduled task to run.
- Any dialog boxes created by macros run by the Task Scheduler will automatically be closed. This is done to prevent dialog boxes from stalling the execution of the tasks.
- You can control string an numeric parameters using the Task Scheduler. Use $$$
Keeping it custom,
Keith
Want to keep up with new CADSharp.com content? Sign up for our newsletter.
7 Ways To Run A Macro Without the Run Button
How do you run your macros right now? Tools–>Macro–>Run? By clicking Run on the macro toolbar? If macros are even a small part of your workflow, you can do much better. In this post, I want to increase your versatility by showing you four ways you can run a macro without having to use the Run button.
1. Using custom toolbar and keyboard shortcuts
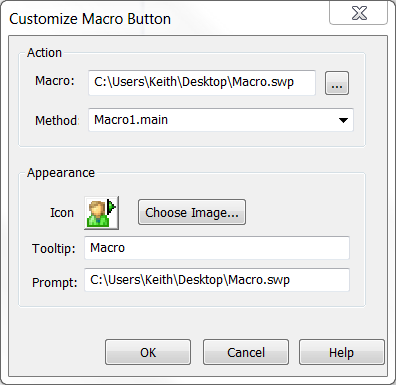
Many of you may know of this option already, but it is still worth mentioning. You can create custom toolbar shortcuts for any macro by going to Tools–>Customize, Commands tab, choosing the Macro category from the list on the left, and then dragging the New Macro Button icon onto a toolbar of your choose.
As soon as you release the mouse button, you should get a dialog prompting you for the macro location (which you can browse for), the button tooltip, and the method. Specifying the correct method is very important since this is the first method that will be run when the macro is executed.
If you want to take it step further, while you’re still in the Customize dialog box, go to the Keyboard tab, search for your new macro button, and add a keyboard shortcut.
2. When SolidWorks starts
This option is invaluable for event-based macros that run code when a certain event fires, because it is ensures that you never forget to turn on the macro when SolidWorks starts. (To see some great examples of event-based macros, check out our Macro Library and look under the Notifications section.) After you create a shortcut directly from your executable, go into the shortcut properties and modify the target using the following syntax:
“<path to SolidWorks executable>” /m “<path to macro>”
As an example, if your SolidWorks executable is in the default file location on Windows 7 x64 and your macro, called “macro.swp”, is on C:\, your target would look like this:
“C:\Program Files\SolidWorks 2012\SolidWorks\” /m “C:\macro.swp”
3. From another macro
Yes, it is possible to “chain” macros to together using ISldWorks::RunMacro2. In this method you’ll find arguments that allow you to specify the path to the macro you wish to run and also the initial method that you want to run. This is a great option when you want to keep tasks separate in your macro workflow or quickly swap out tasks. For example, your main macro might have a form that allows a user to specify a macro to run before or after your main task is accomplished.
To see a very simple example of ISldWorks::RunMacro2, check out “Run a macro from another macro” in the Macro Library.
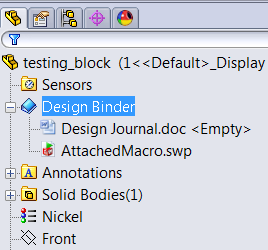
4. From the Design Binder
Many SolidWorks users do not know what the Design Binder is, let alone that you can run macros from it. The Design Binder is essentially a backpack for your SolidWorks model that allows you to attach relevant documents. This could include a word document, a spreadsheet, and, yes, even a macro. Consequently if you have written a macro specific to a document and need to make sure that the two stay together, attaching it to the Design Binder is a great option. Then if you write another macro that needs to run the macro attached to the Design Binder, you simply call ISldWorks::RunAttachedMacro. Much like ISldWorks::RunMacro2, you need to specify the sub procedure you want to run initially.
Do you know of any other useful ways to run a macro? Please share below.
5. From the Task Scheduler
Have a macro that you’d like to run on all models in a directory while out of the office? Enter the Task Scheduler. Located in the SolidWorks Tools directory in your Start Menu, this program allows you to schedule batch operation tasks like updating the versions of your files, converting your models to DXF, updating custom properties, and so on. Those with SolidWorks Professional or Premium have the “Run Custom Task” option, which allows you to schedule the execution of a macro as well as specify its parameters. Learn more about using macros with the Task Scheduler here.
6. From a macro feature
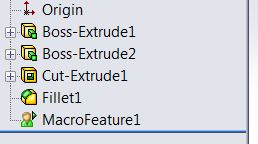
Macro features are custom SolidWorks features defined by the SolidWorks API. They reside in the feature-tree and can be added, edited, and deleted like any other feature. The bulk of the code defining a macro feature gets run when a document rebuilds, so during this time you can have the macro perform any task that doesn’t cause a rebuild. You can learn more about macro features here. Note, however, that macro features are ideally used for actually modifying geometry. If you simply want to run some code every rebuild, I’d encourage you to use equation-triggered macros instead, which are described in the next section.
7. From an equation
Few know that you can insert VBA code in an equation so that it gets run every time the equation is recalculated (which is every rebuild). Combine this trick with ISldWorks::RunAttachedMacro and ISldWorks::RunMacro2, which I described earlier in this post, and you have a pretty nifty technique for embedding and running macros while a part or assembly is open. Plus, the macro can travel with the document if you desire. These types of macros, which I call equation-triggered macros, are explained in great detail here. ETMs are usually the most effective way to run a macro without involving the end user.
Stay versatile, friends.
Keith
Want to keep up with new CADSharp.com content? Sign up for our newsletter.


