
Keith Rice | Technical Director | CADSharp.com | keith@cadsharp.com
This guide is provided as-is. By using it, you accept any responsibility for any consequences, intended or unintended, that result.
Introduction
Unfortunately, creating an installer package for a SolidWorks addin is a non-trivial task. What I present below is what I consider to best option for creating one, using the Visual Studio 2015 Installer Projects extension. It is simple, free (including the version of VS 2015 that we will use), and robust enough for any addin.
Some earlier versions of Visual Studio do not have an Installer Projects extension or similar functionality. If you have such a version and cannot move to VS 2015, then you will have to create an installer package via some other means. Options include WiX, InstallShield, InnoSetup, and Nullsoft --- to name a few. These vary in terms of ease of ease, cost, a robustness, so you will have to do your own research on which one is best for you.
Finally, don't forget that no SolidWorks addin requires an installer package (e.g., an MSI or EXE). In many cases, it is simplest to simply deliver the addin with BAT files that run the necessary Windows commands for registering the DLLs. Instructions on how to do this can be found in my instructions "Create A SolidWorks Addin From Scratch", which is also available for purchase from CADSharp.
Prerequisites
Before using this guide, please make sure you have:
- Visual Studio installed on your computer
- A free version, Visual Studio Community, is available here
- Visual Studio Installer Projects extension downloaded and installed
- A working SOLIDWORKS addin
- The addin used in this guide can be downloaded below
MyFirstAddin.zip
- The addin used in this guide can be downloaded below
Instructions
Basic setup
- Open your addin in Visual Studio
- Right click on the solution name --> Add --> New Project
- If you cannot see the solution, go to Tools-->Options-->Projects and Solutions and check "Always show solution" (see image here)
- In the left pane of the Add New Project dialog, choose Installed-->Other Project Types-->Visual Studio Installer and choose "Setup Project".
- Enter a name (e.g., "Installer") and click OK.
- If you want to change the installer package's file name, right click on the installer project name in the Solution Explorer --> Properties and do so under "Output file name" in the dialog that appears.
Modifying installer package properties
- In the Properties tab, you'll find many properties related to the installer. I would recommend that you modify the following:
-
AddRemoveProgramsIcon: If you have an icon (*.ico) that should appear next to your addin name within the Windows' Add/Remove Programs dialog, browse for it here
-
Author: Change to your company name (e.g., CADSharp LLC)
-
Manufacturer: Change to your company name (e.g., CADSharp LLC)
-
ManufacturerUrl: Your web site (e.g., www.cadsharp.com)
-
ProductName: The name of your addin (e.g., "My First Addin")
-
ProductCode: Technically this GUID should be changed with every new build of your installer, however it is not absolutely necessary for reasons I describe in the notes below. A simple way to change it automatically is to modify the Version property.
-
RemovePreviousVersions: If you leave this as False, then multiple listings of the addin will be present in Add/Remove Programs.
-
TargetPlatform: Unless you've created an addin for a 32-bit version of SolidWorks, change this to x64
Note: If you leave this on x86 and install on a 64-bit computer, the registry keys you specify later will be added to HKLM\Software\SolidWorks\Wow6432Node and your addin will not appear in SolidWorks.
-
Title: The title of the installer (e.g., "My First Addin Installer")
-
Version: This is displayed in the Add/Remove Program dialog and should correspond to the addin File Version. If you change this, you will be prompted to change the ProductCode, which you should do.
-
Adding the DLLs
-
If the File System Editor window doesn't open automatically, open it by clicking the File System Editor shortcut in the Solution Explorer:

-
Click Application Folder in the File System Editor
- Note: The other two folders, "User's Desktop" and "User's Program Menu" would be used to create shortcuts to our application, but such shortcuts cannot exist with a SolidWorks addin and hence we will never add anything here
-
In the right pane, right click-->Add-->File and browse for all addin DLLs
- Dependencies are added to the list automatically
- Note: The DLL(s) is not "embedded" in the installer project, only referenced. If you update the addin DLL(s) then you need only rebuild the installer project.
-
If you are using an addin icon that will appear in the Tools-->Addins dialog in SolidWorks, repeat the previous step to add the icon bitmap file as well
-
For each addin DLL (i.e., the DLLs built from your addin project), right click-->Properties Window
-
In the Properties pane, modify this properties:
- Register: vsdraCOM
Updating the registry
-
Open the Registry Editor by clicking the shortcut in the Solution Explorer. This lets us specify what keys will be added on the target machine.

The following steps show you how to manually add the keys. Alternatively, if you're on your development machine and the addin is already registered with SolidWorks, you can export these keys from the actual Registry Editor and then import them into the Installer Projects Registry Editor.
-
Add these keys to HKEY_CURRENT_USER, replacing the GUID shown below with your own addin GUID.
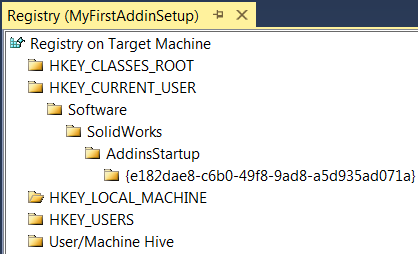
- Click on the key named after your GUID. In the right pane, add this value:
-
(Default): Create this is as a DWORD value with no name. Visual Studio will automatically re-title it (Default) even though it technically has no name. Do not actually type in "(Default)" as the name or your MSI will create two (Default) registry keys during installation. Change the value to 1 if you want the addin to load on startup or 0 if you do not.
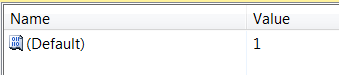
-
Although SolidWorks will create this key automatically, it will not remove the key when the addin is uninstalled. Therefore we add it so that the MSI package will know to remove it during uninstallation.
- Add these keys to HKEY_LOCAL_MACHINE, replacing the GUID shown below with your own addin GUID.
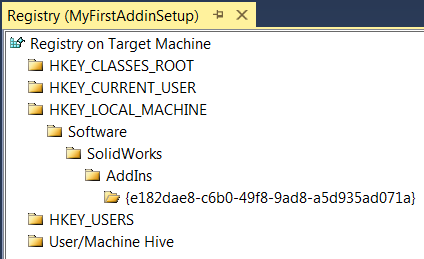
- Click on the key named after your GUID. In the right pane, add these values:
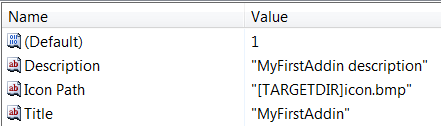
- Title: String value containing your addin's title
- Description: String value containing your addin's description
- Icon Path: Optional. Only use if you want an icon to appear next to your addin in Tools-->Addins within SolidWorks. You can hard-code a path or you can use [TARGETDIR] to specify the installation folder on the target machine.
- (Default): As mentioned earlier, create this as a DWORD value with no name. Set the value to "1" if you want your addin to load on SolidWorks startup, otherwise set to "0".
Example of the above values:
- If you wish to modify the installer user interface, you can do so by clicking the User Interface shortcut in the Solution Explorer and modifying the various dialogs and controls as desired.

- Right-click the Installer Project in the Solution Explorer-->Build.
- Test your MSI by right-clicking on the Installer Project in the Solution Explorer --> Install.
It is not necessary to unregister your development DLL if it is currently registered. The new DLL location will simply overwrite the old DLL location. However, if you need to debug your addin again with Visual Studio, then you will need to re-register the development DLL.
Additional Notes
- Creating the installer project in the existing addin solution allows you to easily refer back to the addin for the GUID as well as control the installer project source code in the same repository as your addin. Nevertheless, if you want to create your installer project as its own solution, then change the first two steps to these:
- Open Visual Studio
- File-->New Project
-
Concerning the ProductCode property: Each MSI has an internal build ID. If you build the installer project without changing the GUID, then two installer project builds exist with the same GUID. If you use the first to install the addin but the second to uninstall or repair the addin (by double clicking on it), then you will encounter this error message:
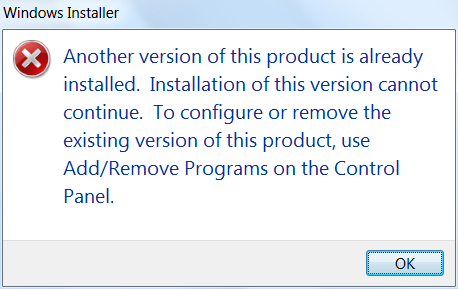
As you can see, however, the dilemma is easily resolved by always uninstalling or repairing via Add/Remove Programs. Therefore, it isn't absolutely necessary to always change the ProductCode GUID, though doing so is very easy by simply changing the installer Version.
-
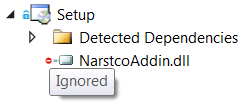
If the DLL(s) packaged by your MSI are under source control and are being ignored by source control then they might have a small red dot on their icon in the solution explorer and mousing over the icon will also say "Ignored". This does not affect your MSI in any way.
-
Building the installer project will sometimes fail with no errors. This might be related to bugs in the Installer Projects extension. If building fails, deleting and re-adding the DLL(s) (don't forget to change the Register property to vsdraCOM) will fix this. Other fixes sometimes work:
-
Building the installer project will sometimes fail with an error related to the bootstrapper. Right click the installer project and choose Rebuild instead of Build.
-
Concerning the Version property from step 6:
- Your installer project's Version property should correspond to your addin's File Version since this will be listed in Add/Remove Programs.
- Run MSI with earlier version already installed: Older version will be replaced with newer version so long as your installer project's RemovePreviousVersions property is true.
- Run MSI with same version already installed: You will be prompted to repair or uninstall.
- Run MSI with newer version already installed: You will be prevented from installing.
- If you have multiple projects in your solution that build multiple DLLs, all of these DLLs should be versioned. When a change is made to a project, the version should incremented, otherwise the DLLs will not get upgraded properly on a machine where the program is installed. The MSI only upgrades the DLLs it perceives as being out-of-date.
-
If you build your MSI and get a warning that says "Could not find prerequisite <.NET framework version> in path ..." then go to Prerequisites in your installer project's properties and remove any flagged prerequisites.
-
If you get a bootstrapper error when building the installer executable ("ERROR: An error occurred generating a bootstrapper") then you may need to turn off your antivirus protection.