
Keith Rice | Technical Director | CADSharp.com | keith@cadsharp.com
This guide is provided as-is. By using it, you accept any responsibility for any consequences, intended or unintended, that result.
Introduction
This guide will show you how to create an addin from scratch in VB.NET or C#. These are both .NET languages and the only difference between the two is syntax; they both actually compile down to the same language at run-time. Nevertheless, if your only experience with programming is using VBA macros, VB.NET is recommended.
This guide will assume that you are familiar with variables, methods, and classes. If you intend to do serious add-in programming, it is also recommended that you get some training in object-oriented programming (OOP) in .NET, otherwise you could potentially make very poor design decisions while you program, resulting in code that is hard to debug, maintain, re-use, and enhance.
Occasionally the term "COM" is used. COM (Component Object Model) is a technology developed in the early 90's by Microsoft that allows programs to communicate with one another, even if they were written in different languages. Around 2001, COM was superseded by .NET, but not deprecated. Though we will write our addin using .NET languages (thus creating a .NET DLL), SolidWorks is COM-based, therefore we will do various things while writing and registering our addin that will make it understandable by COM.
Prerequisites
- SOLIDWORKS 2012 or later is installed
- Visual Studio is installed. A free edition, called Visual Studio Community, is available here.
Instructions
Setting up the Visual Studio project
- In this section, we will create a new class library project in Visual Studio.
- In Visual Studio, go to File-->New Project.
- In the dialog that appears, click Templates in the left-most pane.
- Choose Visual Basic or Visual C# depending on whether you want to use VB.NET or C#.
- In the middle pane, choose Class Library (.NET Framework).
- Use "MyFirstAddin" for the name.
- In older versions of Visual Studio, you might not have the option to name or save your project in this dialog. You will have to create the project and then use the Save All button to name and save.
- Browse to where you want to save your project.
- Make sure that "Create directory for solution" is checked, in the event that you create another project in the same solution (such as an installer project).
- Do not save to a network or mapped drive because this can cause problems when you try to register your addin.
- Click OK
I would recommend that you use Windows Explorer to examine the folders that were created. The top level folder will contain the solution (.sln) and a sub-folder will contain the project (.vbproj / .csproj).
- Rename the entry class to something more meaningful, like "Main".
- By default, your project will have a class named Class1.vb / Class1.cs. Right click on this class and choose Rename. After entering the new name, you may be prompted to update all references to this class. Choose Yes.
- Delete all Using / Imports statements at the top of the class, if there are any. Most of these are unnecessary, and it is better that we add them when they become necessary.
Adding references
-
Next we will add references to the SolidWorks interop assemblies to your Visual Studio project.
These DLLs, often simply called "interops", will allow our project to understand the "language" of SolidWorks API and SolidWorks add-ins. These interops are found in your SolidWorks installation folder. We could reference them in that folder directly, but this could cause problems if we give someone else our source code and their interops were not located in the exact same place on their hard-drive. Consequently, it's much safer to actually copy the interops into a new folder in our solution and then reference that folder, since its relative path will always remain the same.
-
In your project folder, locate the folder that conains the "bin" and "obj" folder. You should also see Main.vb / Main.cs in here. In this same folder, create a folder called "thirdparty".
-
In Windows Explorer, browse to \SOLIDWORKS\api\redist.
- These interops were compiled for use with .NET 4.0. The \api\redist\CLR2 contains interops for .NET 2.0. You would only use these .NET 2.0 interops if you expect your addin to be installed on a computer that doesn't have .NET 4.0 installed. (This is unlikely.)
-
Copy any interops you will be using in your addin into the "thirdparty" folder. The first one listed is the only one that is absolutely necessary, but I have listed some other interops are commonly included as well depending on your program's needs.
- SolidWorks.Interop.swpublished.dll
- Required. This contains ISwAddin, which must be implemented in every addin.
- SolidWorks.Interop.sldworks.dll
- Optional. This contains the SolidWorks API. If your addin will use the SolidWorks API in any way, include this.
- SolidWorks.Interop.swconst.dll
- Optional. This contains most of the enumerations in the SolidWorks API, hence it is almost always included when the previous interop is included.
- SolidWorks.Interop.swcommands.dll
- Optional. This contains the enumeration used by ISldWorks::RunCommand. If you intend on using this API call then you should also include this interop.
- SolidWorks.Interop.swdocumentmgr.dll
- Optional. This contains the Document Manager API, which allows a programmer to obtain the metadata from a SolidWorks model. Include this if you intend on using this API within your addin.
- SolidWorks.Interop.swpublished.dll
-
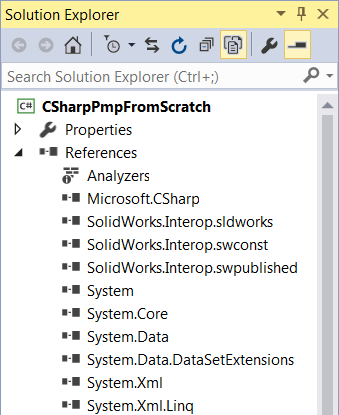
In Visual Studio, go to Project-->Add Reference-->Browse and browse for the DLLs you just added to "thirdparty" folder. In VB.NET projects and some versions of Visual Studio, you might only see the references after clicking the Show All Files button (the button to the left of the wrench button) in the Solution Explorer.
-
-
Add Imports / Using statements at the very top of Main.vb / Main.cs. These are not essential to the running of our program, but they will save us the need to do some extra typing when we need to declare certain variables. Assuming you only referenced sldworks.dll and swpublished.dll, here is what you will type:
VB.NET
Imports SolidWorks.Interop.swpublished
Imports SolidWorks.Interop.sldworks
C#
using SolidWorks.Interop.swpublished;
using SolidWorks.Interop.sldworks;
Implementing ISwAddin
-
Next we will implement the ISwAddin interface that is contained within swpublished.dll. In programming, an interface is like a contract. It requires the class that implements it to fulfill certain obligations. In our case, by implementing ISwAddin, we are requiring Main.vb / Main.cs to contain two methods (ConnectToSW and DisconnectFromSW) that every addin must have in order to connect to and disconnect from the host SolidWorks applications.
-
In VB.NET, we implement ISwAddin underneath our class declaration. In In C#, we implement ISwAddin on the same line as our class declaration, separating the class name and the interface with a colon.
VB.NET
Public Class Main
    Implements SwAddin
C#
public class Main : SwAddinIn VB.NET, as soon as you are finished typing "Implements SwAddin" you can hit enter and the two methods contained within should automatically be added below. In C#, you might have to mouseover SwAddin and, using the "lightbulb" pop-up menu, choose "Implement interface". Then the two methods will appear.
-
Once successfully implemented, the ConnectToSW and DisconnectFromSW functions should be present in your class. If they contain a line that throws a NotImplementedException, delete these lines.
-
Since these functions are Booleans, we need to return a Boolean value within each function. In this example, we'll return True. (Returning False in ConnectToSW() would cancel the loading of our addin. Returning False in DisconnectFromSW() will still unload your addin.)
-
Now your code should look like this:
VB.NET
Public Function ConnectToSW(ThisSW As Object, Cookie As Integer) As Boolean Implements ISwAddin.ConnectToSW
    Return True
End Function
Public Function DisconnectFromSW() As Boolean Implements ISwAddin.DisconnectFromSW
    Return True
End Function
C#
public bool ConnectToSW(object ThisSW, int cookie)
{
    return true;
}
public bool DisconnectFromSW()
{
    return true;
}
-
-
When our add-in connects to the SolidWorks application, we are passed a pointer to the SolidWorks application object (SldWorks) via the "ThisSW" variable. We should make it available to other classes in our addin via a shared / static property. In order to encapsulate it properly, we will make it visible only in this project and read-only except in this class.
VB.NET
Public Class Main
    Implements SwAddin
    Shared _app As SldWorks
    Friend Shared ReadOnly Property App As SldWorks
        Get
            Return _app
        End Get
    End Property
    Public Function ConnectToSW(ByVal ThisSW As Object, ByVal Cookie As Integer) As Boolean Implements SwAddin.ConnectToSW
        _app = ThisSW
        Return True
    End Function
...
C#
public class Main : SwAddin
{

    internal static SldWorks App { get; private set; }
    public bool ConnectToSW(object ThisSW, int cookie)
    {
        App = (SldWorks)ThisSW;
        return true;
    }
...
Using the ISldWorks pointer
-
To verify that our addin is working properly once we run it, let's use this SldWorks variable within the two functions to display a message upon connection and disconnection. Put the first line presented inside ConnectToSW() and the second in DisconnectFromSW().
VB.NET
Public Function ConnectToSW(ByVal ThisSW As Object, ByVal Cookie As Integer) As Boolean Implements SwAddin.ConnectToSW
    _app = ThisSW
    _app.SendMsgToUser("Hello!")
    Return True
End Function
Public Function DisconnectFromSW() As Boolean Implements SwAddin.DisconnectFromSW
    _app.SendMsgToUser("Goodbye!")
    Return True
End Function
C#
public bool ConnectToSW(object ThisSW, int cookie)
{
    App = (SldWorks)ThisSW;
    App.SendMsgToUser("Hello!");
    return true;
}
public bool DisconnectFromSW()
{
    App.SendMsgToUser("Goodbye!");
    return true;
}
Disconnecting from SOLIDWORKS
- When the addin disconnects from SolidWorks, we need to free up the memory it has allocated. This is done by releasing the COM object and using the Garbage Collector, which tells .NET to clean up unused resources.
-
Before we do this, we need to add two other Imports / Using statement at the top of our class for System.Runtime.InteropServices and System.
VB.NET
Imports System.Runtime.InteropServices
Imports System
C#
using System.Runtime.InteropServices; using System; -
Then add this code to DisconnectFromSW:
VB.NET
Public Function DisconnectFromSW() As Boolean Implements SwAddin.DisconnectFromSW
    _app.SendMsgToUser("Goodbye!")
    Marshal.ReleaseComObject(_app)
    GC.Collect()
    GC.WaitForPendingFinalizers()
    GC.Collect()
    GC.WaitForPendingFinalizers()
    Return True
End Function
C#
public bool DisconnectFromSW()
{
    App.SendMsgToUser("Goodbye!");
    Marshal.ReleaseComObject(App);
    GC.Collect();
    GC.WaitForPendingFinalizers();
    GC.Collect();
       GC.WaitForPendingFinalizers();
    return true;
}
-
Adding COM class attribute tags
-
Next we need to add COM class attribute tags. These will allow SolidWorks to distinguish your add-in COM DLL from other COM DLLs. COM Attribute tags are placed on the line directly above the class/property they are defining. For the class attribute tags, we need to specify two attributes: 1) Globally Unique Identifier (GUID) - distinguishes this COM DLL from other COM DLLs, also known as a CLSID, 2) COM visibility - set to true so SolidWorks can see the add-in DLL.
GUIDs are randomly generated. Since they are such large hexadecimal values, the likelihood of us generating a GUID identical to an existing one is extremely low. To create a GUID in Visual Studio, go to Tools-->Create GUID. Choose the GUID format that matches the one below (#6 in VS Community 2015) and paste it inplace of the appropriate code below. If your version of Visual Studio does not have this GUID creation tool, use guidgenerator.com.
The Guid and ComVisible tags need to be placed on the line before your class declaration.
VB.NET
<Guid("xxxxxxxx-xxxx-xxxx-xxxx-xxxxxxxxxxxx")> <ComVisible(True)>
Public Class Main
C#
[Guid("xxxxxxxx-xxxx-xxxx-xxxx-xxxxxxxxxxxx"), ComVisible(true)] public class Main : SwAddin -
Build the addin DLL by going to Build-->Build MyFirstAddin. The output window and the message bar at the bottom of Visual Studio should say that the build succeeded. Your built DLL will be built at \bin\Debug\MyFirstAddin.dll.
Registering the addin
-
At this point, we have a fully functional add-in. Nevertheless, if you open up SolidWorks, you will not see your addin listed in Tools-->Addins, because SolidWorks doesn't know anything about our addin. To resolve that, we need to do add registry keys in two places:
- HKEY_CLASSES_ROOT\CLSID. This is where Windows stores information about DLLs registered with COM.
- HKEY_LOCAL_MACHINE\Software\SolidWorks\AddIns. This is where SolidWorks stores information about available addins.
-
To register our .NET DLL with COM, we will use RegAsm.exe. This utility is provided by Microsoft and is found in C:\Windows\Microsoft.NET\Framework64\<.NET version>. Unless you are creating your addin to run on a computer that doesn't have .NET 4.0 installed, you should use the RegAsm.exe found in the folder named "v4.0.30319". To manually use the utility, you must run the command prompt as an administrator and type in the following, replacing with the actual path to the DLL:
C:\Windows\Microsoft.NET\Framework64\v4.0.30319\RegAsm.exe /codebase "<DLL path>"If we ever need to unregister our DLL, we would use the exact same command, but also include the /unregister flag:
C:\Windows\Microsoft.NET\Framework64\v4.0.30319\RegAsm.exe /unregister /codebase "<DLL path>"Using the command prompt is tedious, however, so it is preferable to execute these commands using a batch (.bat) file, instead. A batch file is simply a text file with a .bat or .cmd extension that, when run, will execute the commands contained within in order as though they were all entered into the Windows command prompt.
-
In your project folder (the folder containing MyFirstAddin.vbproj), right click-->New-->Text Document.
-
Change the name and extension of the document to "register.bat".
- Important: If your Windows folder settings do not have "Hide extensions for known file types" unchecked, you might accidentally create this file as "register.bat.txt". If that happens, then double-clicking on this file will simply open notepad and not the Windows console.
-
Right click on the .bat file --> Edit.
-
Add in the command we used in the command prompt into the document, followed by "pause" on the second line:
C:\Windows\Microsoft.NET\Framework64\v4.0.30319\RegAsm.exe /codebase "%~dp0\bin\Debug\MyFirstAddin.dll"
pause
Note #1: The "%~dp0" variable provides the current folder of the .bat file. Alternatively, you can hard-code in the entire path to the DLL.
Note #2: Adding "pause" will simply keep the console window open until the user presses a key.
-
Save register.bat file and close it.
-
Copy register.bat file and rename the copy to "unregister.bat".
-
Edit unregister.bat and add the /unregister flag. (See the command line examples above if you're unclear on what to do here.)
-
Save unregister.bat and close it.
- Test both .bat files, first register.bat and then unregister.bat. Batch files are executed by double-clicking on them like you would double-click an EXE. If you get an error about lacking administrative permissions, try right-clicking on the .bat file and running it as an administrator.
- Running register.bat should say "Types registered successfully" after it gives a warning about using an unsigned assembly with /codebase.
- Running unregister.bat should say "Types unregistered successfully".
-
-
Next, lets talk about registering our DLL with SolidWorks. SolidWorks knows an addin exists on the current computer if a key named after the DLL GUID is found in HKLM\Software\SolidWorks\AddIns. This key needs to have three values that SolidWorks will use: 1) (Default) - a 0 or 1, depending on whether we want our addin to load on startup (0 = false, 1 = true) the first time the addin runs, 2) Title - the name of the addin as will appear in Tools-->Addins, 3) Description - a description for the addin that will appear when the user mouses over the addin in Tools-->Addins.
When and how should we add / remove these registry keys during the installation / uninstallation of our addin? We could add them manually using regedit, of course, but that would be incredibly tedious. We could modify our register.bat and unregister.bat scripts to include additional commands to not only run RegAsm.exe but also add these keys. That's not a terrible option, but we can do even better: We can actually add functions into our DLL that automatically get run when the DLL is registered via RegAsm.exe. This will allow us to accomplish more in the addin DLL itself so we don't have to rely on auxiliary tools like batch files as much.
-
Create two shared / static functions and place the ComRegisterFunction attribute tag in front of one and ComUnregisterFunction in front of the other, like this:
VB.NET
<ComRegisterFunction()>
Private Shared Sub RegisterFunction(t As Type)
End Sub
<ComUnregisterFunction()>
Private Shared Sub UnregisterFunction(t As Type)
End Sub
C#
[ComRegisterFunction]
private static void RegisterFunction(Type t)
{
}
[ComUnregisterFunction]
private static void UnregisterFunction(Type t)
{
}
The function names are arbitrary. What is important is the tags. It should be obvious that the first will run on registration (when we run register.bat) and the second on unregistration (when we run register.bat).
- Now let's add code to these functions that will actually create the SolidWorks registry keys. As you can see, we're using .NET functions to create the registry keys.
VB.NET
<ComRegisterFunction()>
Private Shared Sub RegisterFunction(t As Type)
    Dim hklm As Microsoft.Win32.RegistryKey = Microsoft.Win32.Registry.LocalMachine
    Dim hkcu As Microsoft.Win32.RegistryKey = Microsoft.Win32.Registry.CurrentUser
    Dim keyname As String = "SOFTWARE\SolidWorks\Addins\{" + t.GUID.ToString() + "}"
    Dim addinkey As Microsoft.Win32.RegistryKey = hklm.CreateSubKey(keyname)
    addinkey.SetValue(Nothing, 1)
    addinkey.SetValue("Description", "This is my first addin")
    addinkey.SetValue("Title", "MyFirstAddin")
    keyname = "Software\SolidWorks\AddInsStartup\{" + t.GUID.ToString() + "}"
    addinkey = hkcu.CreateSubKey(keyname)
    addinkey.SetValue(Nothing, 1)
End Sub
<ComUnregisterFunction()>
Private Shared Sub UnregisterFunction(t As Type)
    Dim hkcu As Microsoft.Win32.RegistryKey = Microsoft.Win32.Registry.CurrentUser
    Dim keyname As String = "SOFTWARE\SolidWorks\AddinsStartup\{" + t.GUID.ToString() + "}"
    hkcu.DeleteSubKey(keyname)
    Dim hklm As Microsoft.Win32.RegistryKey = Microsoft.Win32.Registry.LocalMachine
    keyname = "SOFTWARE\SolidWorks\Addins\{" + t.GUID.ToString() + "}"
    hklm.DeleteSubKey(keyname)
End Sub
C#
[ComRegisterFunction()]
private static void RegisterFunction(Type t)
{
    Microsoft.Win32.RegistryKey hklm = Microsoft.Win32.Registry.LocalMachine;
    Microsoft.Win32.RegistryKey hkcu = Microsoft.Win32.Registry.CurrentUser;
    string keyname = "SOFTWARE\\SolidWorks\\Addins\\{" + t.GUID.ToString() + "}";
    Microsoft.Win32.RegistryKey addinkey = hklm.CreateSubKey(keyname);
    addinkey.SetValue(null, 1);
    addinkey.SetValue("Description", "This is my first addin");
    addinkey.SetValue("Title", "MyFirstAddin");
    keyname = "Software\\SolidWorks\\AddInsStartup\\{" + t.GUID.ToString() + "}";
    addinkey = hkcu.CreateSubKey(keyname);
    addinkey.SetValue(null, 1);
}
[ComUnregisterFunction]
private static void UnregisterFunction(Type t)
{
    Microsoft.Win32.RegistryKey hkcu = Microsoft.Win32.Registry.CurrentUser;
    string keyname = "SOFTWARE\\SolidWorks\\AddinsStartup\\{" + t.GUID.ToString() + "}";
    hkcu.DeleteSubKey(keyname);
    Microsoft.Win32. RegistryKey hklm = Microsoft.Win32.Registry.LocalMachine;
    keyname = "SOFTWARE\\SolidWorks\\Addins\\{" + t.GUID.ToString() + "}";
    hklm.DeleteSubKey(keyname);
}
Note: If you only want to install your addin within a certain version of SolidWorks, then you need to add the key only to HKLM\Software\SolidWorks\SolidWorks 20XX\Addins rather than just HKLM\Software\SolidWorks\Addins.
- Before we continue, I want to explain how exactly SolidWorks knows where our DLL is located. When you register your DLL with RegAsm.exe, a key is created in HKCR\CLSID that is named after the addin GUID. Within this key is a subkey called InprocServer32 that contains a (Default) value with the path to the DLL. When SolidWorks is loaded, all of the keys in HKLM\Software\SolidWorks\Addins are collected. Remember that the names of these keys are the GUIDs themselves for each SolidWorks addin. SolidWorks then searches HKCR\CLSID for these GUIDs in order to get the path to the DLL from the InprocServer32 key.
While this explanation may seem esoteric, there are two notable takeaways:
- If you move an addin DLL after it is registered, SolidWorks will not be able to load it. If you need to move it, you should unregister it at the original location, move it, then re-register it at the new location.
- Each time you create a new version of a DLL (e.g., you make a change to the addin) you do not need to re-register it, since the necessary registry keys are still present. As long as the new DLL has replaced the old one, the changes should be present.
- Rebuild your addin via Build --> Build MyFirstAddin and make sure everything compiles correctly. Run register.bat to ensure that the DLL is registered. Again, you should see "Types registered successfully" following a warning about using /codebase. This occurs because your assembly is unsigned. In my opinion, strong-signing creates an extra step in the development process that isn't necessary unless you plan on selling your addin. Strong-signing will give your assembly a unique identity so that your customers always know they are using an assembly that came from the same publisher. Learn how to strong-sign an assembly here.
Enabling Visual Studio debugging
- Next, let's set up the project so we can use Visual Studio's debugging tools. If you have written VBA macros, you know that in the Visual Basic editor you can step through your code line by line, set breakpoints, examine variable values during run-time, etc. as long as you run the macro from within the VB editor. This makes debugging much faster and we surely want to do the same within Visual Studio. Right now, if you click the green "Run" button in the top toolbar, you'll get this error message:
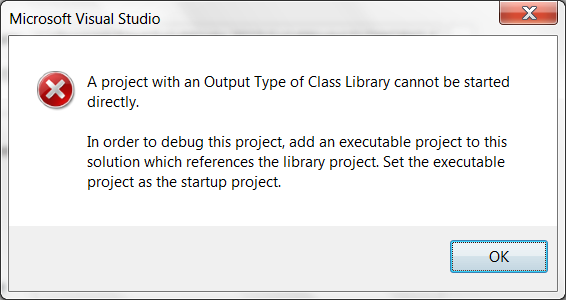
To remedy this, follow these steps:
a. Project-->MyFirstAddin Properties

b. Go to the Debug tab on the left side of the new window that appears

c. Start Action --> Start external program

d. Browse for SLDWORKS.EXE on your system (if you have multiple versions of SolidWorks, you will need to pick which one you want to debug with)
After you have specified an external startup program, you should be able to run your addin from Visual Studio using the green arrow (or F5). Try placing some breakpoints on various lines of code in ConnectToSW() to verify that debugging is working correctly. Note that, unlike with the VBA editor, you cannot modify code during run-time.
Distributing Your Addin
General Tips
- You will only need to distribute your addin DLL so long as each of your interop DLLs has the Embed Interop Types property set to True. You can examine this property by right clicking on the interop reference in the Solution Explorer --> Properties. True is the default value for this property. If it is True, the code in the interops that is used by your addin is actually embedded in your addin DLL. This is very useful because it means we only need to distribute a single DLL to the end user instead of multiple DLLs.
- Many customers would prefer to install the addin from an MSI / EXE file instead of using BAT files. This isn't necessary but it can give your distribution a more professional feel. While many options exist for creating an installer package, my preference is to use the Visual Studio Installer Projects extension. CADSharp also offers a guide for using this tool to create MSI files that will register your addin with COM, add the appropriate registry keys, and create a listing in Programs and Features.
- When distributing the addin using BAT files, I include written instructions explaining how to install and uninstall the addin using the BAT files. See the appendix. I zip this document up with the BAT files, addin DLL, and dependencies and provide it to the user.
- You should use versioning with your addin so the user can easily ensure that he or she is using the latest version. The best way to do this is via the addin project Assembly Information. This lets the customer view the DLL file version by right clicking the DLL in Windows Explorer --> Properties --> Details tab.
Installation / uninstallation instructions using a BAT file
If an EXE or MSI installer is not being used with your addin, you can provide the following instructions to the end user:
FIRST TIME INSTALLATION
You should have received the addin DLL(s) and two .bat files.
- Unzip the DLLs to the location where you want them to reside permanently.
- RECOMMENDED: Do not install addins on a network drive, only a local drive.
- Note that only one of the DLLs is actually your addin. The rest, if there are any, are simply references. Your addin will be named after something related to your company or project (e.g., "Acme Tools.dll")
- Right click on your DLL, go to Properties, and click the Unblock button at the bottom (if this button exists) and then leave the Properties dialog.
- Right click on register.bat, which should be in the same folder as the addin DLL, and choose “Run as administrator”.
- After the .bat file runs, you should see “register types successful” listed amongst other text.
- When you open SolidWorks, you should be able to go to Tools àAddins and see your addin listed
UNINSTALLATION
To uninstall your addin:
- Locate “unregister.bat” and make sure it is in the same folder as the addin DLL
- Double click on the .bat file. You should see a message that unregistration was successful.
UPGRADING YOUR ADDIN
When you receive a new version of your addin DLL, you do NOT need to uninstall first and then reinstall, or simply reinstall. You need only replace your outdated DLL with your new DLL. Be sure to close and re-open SolidWorks after replacement.
References and Resources
- Using SwAddin to Create a SOLIDWORKS Add-In
- SolidWorks API SDK
- SolidWorks API Fundamentals by SolidWorks Corporation
- SolidWorks 2009 API - Advanced Product Development by Luke Malpass, AngelSix.com
- Special thanks to Scott Stanley and Anna Taturevich